Monday, July 28, 2014

The Franklin Institute & Independence National Historical Park (Benjamin Franklin)

I'm not much for taking photos when I travel. I'd rather experience where I am rather than document it with photos I might never look at again. But, I did manage to take a few photos on my visit to Philadelphia this summer. I went for two reasons, one personal and one professional. As a professor of English at Miami Dade College's Kendall Campus, I teach the American Literature 1-year survey courses, and with the Fall Term and American Literature 1 coming up, Independence National Historical Park seemed like the place to go. Over a long weekend, I satisfied an old craving to see where this country started. Mostly, I wanted to see Independence Hall and whatever is left in the Old City regarding Benjamin Franklin's life there. So, here are some of the few photos I took as I walked around Old City.


 Fig. 1: The Franklin Institute directly across Logan Square

One of the things I knew I wanted to visit was The Franklin Institute. I've been there online many times, but like other things in this location, I wanted to see it with my own eyes. The top floor of my hotel provided a surprising image of the city. There was The Franklin Institute just blocks from my hotel on the other side of Logan Square (which is really a circle!). This beautiful view was a great way to start off my visit. 

Fig. 2: One of several entrances to Logan Square

Logan Square turned out to be a lovely park surrounded by trees, dotted with benches for sitting, and crowned with a fountain with added surprises waiting as I drew closer. 


Fig. 3: Tortoise sculpture in the fountain pool


A collection of animal sculptures circle the fountain's pool. I just had to have a photo of one of the tortoises as I have two friends who are particularly enamored of that reptile. 


Fig. 4: Outside the Franklin Institute

The airplane sculpture near the entrance to The Franklin Institute caught my eye as I walked toward the entrance. As it turned out, I was too early, but was able to sit while I waited for the museum to open. 

The exhibits inside are mostly for children, but it was fun wandering around. And, there are things there that I found interesting. First of all, I did know that steam engines had to be BIG. But, I had no idea how big until I stood next to one. There are three pictures below because it was just impossible to get the whole engine in one shot. It was enormous! The wheels are about as tall as I am.
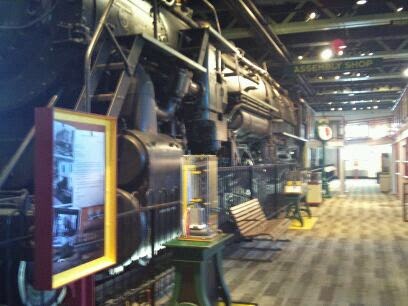


Fig. 5: Steam engine

Have you ever wondered what it might be like to walk through a giant replica of the human heart? Well, I found out. It's cramped. I suppose that is just because the replica is made for children, but I did mange to get through the tight curves and steep stairs of The Giant Heart while listening to the audio of a real heartbeat. The entrance is right around where that diagonal yellow line ends.

Fig. 6: Giant replica of a human heart
But, for me, the most important thing was to see The Benjamin Franklin Memorial. After wandering around the museum a bit, I found the famous statue and was amazed by its size. I deliberately put people in my photo just to show the scale of Dr. Franklin's statue and the hall that it dominates.
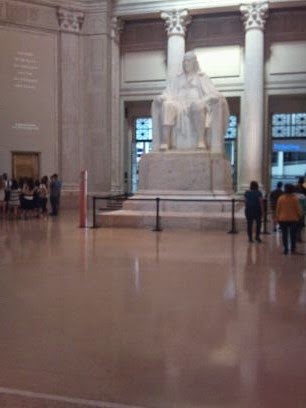


Fig. 7: The Franklin Memorial

I thoroughly enjoyed seeing the tribute to the great man I so admire.

As I left the Institute (after buying a Franklin pocket watch in the shop), I crossed back to Logan Square and another view of the city, the long stretch leading to City Hall.


Fig. 8: View of Philadelphia City Hall

On the Sunday of my weekend, I planned to spend the whole day in Old City. Independence Hall and the rest of Old City are an almost two mile hike from where I was staying. With some directions from hotel personnel, I started walking in the direction opposite that of Logan Square. So, what did I want to see? Independence Hall, of course. The Liberty Bell. Benjamin Franklin's home and gravesite.

It was hot, the walk was long, and I never did get to see the Liberty Bell up close, but I did find everything else. Well, sort of. My search for Franklin's home led me to Franklin's Courtyard, the part of Old City that he once owned. However, there is no house. I love old houses and think it's a shame that his did not come down to us, but the property is still there. An attempt has been made, however.


Fig. 9: Franklin's Court

These white frames show the placement and size of the original buildings. I walked through snapping these photos and went to the small museum and asked directions to Franklin's gravesite. Well, I asked after trying to find it on my own and getting nowhere! I walked my feet off that day in my quest for Franklin. Finally, I found it, too early again, but this time just a ten-minute wait until the gates of the Christ Church Burial Ground were opened. I enjoy historic cemeteries, so I bought entrance and tour tickets to this amazing place.

The cemetery is the original burial ground for Christ Church, which was founded in 1695. The current building dates from 1744 and is still an active church today. The weekend I was there, I could not wander around the building's interior any time I tried because it was closed for a wedding or services were being held. It was nice to see the old building still being used, but it gave me one reason for a return visit to Philadelphia some time in the future.

Finally I found the burial ground, quite a walk from the church, and Franklin's family plot. The tour proved very interesting. 


A lot is known about most of the people who are buried there because a book was written, The Edward Clark Inscription Book,  that documented everything that was known at the time of publication. Many important Philadelphians were members of the congregation and are buried in the cemetery. 


Fig. 10: Gravesite of Dr. Benjamin Rush

To me, the most famous of the other signers of the Declaration of Independence, those I had heard of besides the obvious names, is Dr. Benjamin Rush.

But, there are many "average" people buried here, too. Some grave stones are so old their inscriptions are completely weathered away. Many have sunken into the earth. Here are a few of the more interesting ones:

Fig. 11: The oldest grave (on the right)
The oldest grave at the site is worn away completely and much sunken into the ground. The sign in front of the two stones gives the inscription that was originally engraved on them. Again, while the inscription has been lost on the stones themselves, what was written there is known because of the book that was published. It has also been reprinted, so copies are available today for those who are interested. 

Sometimes, with the permission of descendants and with the money to do the work, stones are raised to the proper level. Here are several stones that have clearly sunken.

Fig. 12: Sunken head stones


Fig. 13: Raised head stones

The horizontal lines on these two stones show the levels to which the stones had sunk. And, while their inscriptions are now visible, time and weather will take their toll until the sign will be needed again in order to read the inscriptions. 
There are other interesting sights as well, notably, "tables" that family could use to set out food while visiting the grave of a loved one.


Fig. 14: "Table" grave stones
In addition to the oldest gravesite I mentioned earlier, there will also, one day, be a last gravesite, the last person to be buried at Christ Church Burial Ground,
 Fig. 15: Last burial
The tour saved the most important grave at Christ Church Burial Ground for last, and so have I: Benjamin Franklin. 
Fig. 16: Extended Family

The stone on the left in Figure 15 marks the grave of Franklin's father-in-law, John Read, who originally owned the plot. On the right is the marker for Francis, Benjamin Franklin and his wife Deborah's young son.

 Fig. 17: Emma Bache

Franklin's daughter "Sally" married into the Bache family.

Fig. 18: Richard and Sarah Bache


 Fig. 19: Benjamin and Deborah Franklin
The large stone over Benjamin and Deborah's grave is covered with coins. In the 19th century, brides started tossing coins on the Franklin's grave for good luck. Today, the money helps maintain the burial ground. While the inscription cannot be seen in this photo, it is very simple, little more than the names of both people. 
So, my search for Benjamin Franklin was over. It was well after Noon, and I had a reservation for lunch at The City Tavern, quite a walk from my current location.


Fig. 20: The City Tavern
In keeping with my "experience it" rather than "photograph it" mentality during this trip, I didn't take any photos of the interior of the City Tavern, which dates from 1773, or my photos of my food to post on Facebook. But, I could well imagine Franklin and his Philadelphia friends enjoying a meal here. It's a wonderful, old building with authentic period food being served by a waitstaff dressed in period costume. I ate Colonial Turkey Pot Pie and a selection of breads, including biscuits made from Thomas Jefferson's favorite recipe. Dessert? Nothing other than Martha Washington's chocolate cake. I didn't think she would have had a recipe for chocolate cake, but there you go. Yum! Chocolate! 

After being all worn out from walking around Old City and stuffed after a big meal, I headed back to my hotel, a 1.7 mile trek. Along the way, I stopped to photograph this wonderful building.

Fig. 20: The Philadelphia Academy of Fine Arts
Behind the pole on the right, you can just see the enormous paint brush peeking out. I was half-way back to the hotel by now, and really looking forward to a little rest.
What about Independence Hall, you ask? Coming up!


Wednesday, February 12, 2014

Doctor Who Quilt Update #12 (and last)

FINALLY! My Eleventh Doctor quilt is finished! It's taken months - since last August - to design and finish, but worth every hour I spent on it. I don't know how many hours I spent on it, but it has been substantial. I hope you enjoyed following my journey.


Check out the label at the bottom LEFT!  Matt did sign my block at New Orleans Comic Con!


Friday, February 7, 2014

Doctor Who Quilt Update #11

It's been a while since I posted an update on the Doctor Who quilt, but I have been working on it . . . slowly. It took a while to figure our how I really wanted to finish it because I kept changing my mind.

In Update #10, I wrote about how I had planned to put a current image of Matt Smith as himself. But, I thought, I'm planning a 50th Anniversary quilt, so I might want an image from that episode. Better to finish the quilt later. Early in December I thought, the 2013 Christmas special is coming up. Maybe, there will be something I want from that episode. Again, I put off finishing the quilt. It just never seemed to be the right time.

Spring semester started in January, and I just didn't have time to work on the quilt anyway. And, then came the big moment. I decided to go to ComicCon in New Orleans because Matt Smith would be appearing. Suddenly, I really wanted to finish the quilt. I used an image of the Doctor reading  Advanced Quantum Physics from the 50th in the upper right corner above the Gallifreyan text images (shown in Update #10). The printable fabric came in handy again. I decided to use an image of the crack in the fabric of the universe at the bottom of that same strip.

There was also the problem of what to use as a quilt label. I had three possibilities. One was an image of the Doctor from "Cold War" (because he looks so great in those sunglasses) with the quilt title "Raggedy Man, Goodnight." The second was an image of the Doctor from "The Time of the Doctor" - Doesn't that episode just make you cry every time?! - with the title "When the Doctor Was Me." Then, there was also my first idea, a 50th Anniversary label with an image from "The Day of the Doctor" with him kissing River. How to choose? I finally decided that, while quilts traditionally have only one label, there was no rule that said my quilt couldn't have more than one. So, the finished quilt will have all three labels. Traditionally, the label is on the back of the quilt, but again, no rule. So, I'm putting one on the front, the "When the Doctor Was Me" label.

Here's the bottom of the quilt with the last row pinned in place:


Last strip layout

I was really looking forward to ComicCon! If only I had time to finish the quilt before I leave! But . . . I have an autograph ticket . . . maybe . . . Matt Smith will sign one of my quilt blocks! I can't finish the quilt yet!

Well, wish me luck. I'm here in NOLA and the autograph session is TOMORROW!!!


Sunday, November 17, 2013

Doctor Who Quilt Update #10

I can't believe I actually managed to get a little sewing in this weekend. I been wanting to get to the construction of the Gallifreyan text image strip for a while now and made a good start of it this afternoon.


Beginning of Gallifreyan text image strip on the right


I plan on using a current image of Matt Smith - yes, Matt, not the Doctor - at the top of the strip. And, yes, a current image with his short hair. I like both the Doctor's floppy hair and Smith's short hair. I know some fans wish he'd grow his hair back, But Doctor Who is all about change, right? Besides, I think Smith should be able to wear his hair any way he wants. So, short it will be. I'm not eliminating the option of another image of him as the Doctor, of course. 

I still have to add a dark blue star strip at the bottom of the quilt, below the TARDIS and bow tie strip, so that the dark blue forms a frame around the TARDIS and bowties before I can add the text strip on the right. That means I also have to figure out what to do with that bottom right corner. I have four Gallifreyan text images left to form a strip for the bottom of the quilt. With four text images left, I will have about 14 inches remaining to finish the bottom strip, plenty of room for an 11th Doctor image in the lower left. There is also the possibility that something will arise in the 50th Anniversary episode that just HAS to be part of this quilt. The same thing could happen with the Christmas special. So, I'm holding my options open for that bottom strip. Maybe, this quilt won't be done until after the first of the year!

There's one more thing I've been considering. The quilt is tall and narrow. I have quite a bit of the planet fabric that I bought for the back of the quilt. I could add wide sections of planet fabric to the sides, bringing those planets to the front side of the quilt. I don't want to make it too big, though, because I want to use the remaining Doctor's plaid jacket fabric, on the diagonal, to bind the quilt edges when I'm done. 

When the binding's finished, I have to apply a label to the back. I've been playing around with possibilities. But, what image to use? What to say on it? Here's my second draft. It has a picture of River and the Doctor, from "The Name of the Doctor," just because River is my favorite of the Doctor's companions.


The Doctor's and River Song's last kiss from "The Name of the Doctor"
 

I know some fans aren't that excited about her, but it's my quilt, so I get to choose!

#SaveTheDay


Sunday, November 10, 2013

Doctor Who Quilt Update #9

OK, so maybe I won't do a wide section with appliqued Gallifreyan images like I described in Update #8. I was having trouble visualizing and liking the design. Maybe, instead, I'll make another strip of squares-in-squares to match the strip of bowties on the left. Yeah, I think that's it.

I've already added a top strip to bring the bowtie count to eleven for the 11th Doctor, with two Gallifreyan images to complete the strip.


Top row added above the TARDIS.
 
Today, I finally printed the rest of the Gallifreyan text images. They're ready to be cut out (5-inch squares) and made into a strip. 
 
 
 Gallifreyan text images ready to cut out


Instead of the blue star fabric surrounding the bowties, the text images will be surrounded by solid red, the same color as the bowties themselves. I have twelve images right now, plenty to create a strip on the right as well as at the bottom. 
 
I had hoped to finish the quilt for the 50th Anniversary on November 23, 2013. But, on second thought, suppose there are images or short quotations from the anniversary episode or the Christmas special that I want to include? I realized yesterday that it might be best NOT to finish it off in time for the 50th!


Wednesday, October 30, 2013

Baking for Doctor Who

On Facebook, some Whovian friends and I were talking about having delicious goodies while watching the Doctor Who 50th Anniversary special on November, 23rd. One of those goodies is Jammy Dodgers, a delicious shortbread cookie with red raspberry filling. Here in the U.S., people either have to buy them on a UK website, buy them from someone who has imported them into the U.S., or bake them. DIY is always my first choice!


A batch of homemade Jammy Dodgers


Here's my recipe for anyone who might be interested.

JAMMY DODGERS (DOCTOR WHO)
¾ cup sugar
2 sticks butter, softened
2 ¼ cups flour
Seedless red raspberry jam
You will need a linzer cookie cutter. The set I bought is at http://www.amazon.com/gp/product/B003CN5SUO/ref=oh_details_o00_s00_i00?ie=UTF8&psc=1, but there are other sets, too.
Cream  butter and sugar together until light and fluffy. Add flour and  mix to make a soft dough.
To roll and cut dough: Roll the dough out half the dough at a time to about ¼  inch thick. Cut cookies into about 2 ½ inch circles. Half the cookies should have their centers cut out as well for the tops. Use a Linzer cookie cutter. Lift the cookies with a thin spatula and place on a baking sheet, being careful not to distort the center-cut cookies.
From my experience: (1) It’s a little tricky to get the heart cutout out of the center. I find that if I pick up the cookie with the spatula and place it in my other hand with my fingers spread out a little, the heart will drop between my fingers, maybe with a little prodding. Then, I have to be careful not to distort the heart shape when I put the cookie on the baking sheet. Works for me! And, if it doesn’t work, I put the cookie in the scrap pile and re-roll! (2) It’s better to bake the bottoms and tops on separate sheets because the bottoms need more time in the oven.
Bake at 325° for 10 minutes; cookies should still be very light, just starting to get golden around the edges. Ovens are different, so keep watch. Do not allow cookies to darken. Allow to cool before removing cookies from the sheet.
Spread some  raspberry preserves on the full cookies (bottoms) and top with the cut cookie (tops), allowing the jam to fill the cut center. Stack prepared cookies carefully on a plate, keeping them from touching the jam  cut centers of any cookies below them. Refrigerate uncovered until jam is set. Store in an airtight container in the refrigerator.
Makes about 24 sandwich cookies.


Oh, dear! Now I want to make some right now!


Saturday, October 26, 2013

Doctor Who Quilt Update #8


I finally figured out how I'm going to lay out the circular Gallifreyan text images. I intend to cut a wide strip of fabric to attach to the right side of the TARDIS quilt, apply fusible web to the backs of the circles, and fuse them to the strip in a semi-circular pattern. It should be easy, right? A 1-day project. So, I thought today would be the day.

The answer to the earlier question is that it's not as easy as it seems, not when you print your first page of images and realize that you're out of ink! My printer has three separate ink cartridges for color, and they're all low. Sadly, I didn't realize they were low until I printed the first page of images where the tan fabric background came out with some green stripes. I don't remember any green in the Doctor's tweed plaid jacket! So, I'm halted again, waiting for a new order of fusible fabric to be shipped to me (because the page I ruined leaves me without enough pages to print all my images). Tomorrow, I take a quick jaunt to Best Buy to pick up three ink cartridges. Ah well, best laid plans . . . .

I do hope to have the quilt finished for the 50th Anniversary episode on November 23rd at the very latest.